Delete the entry from the farm Health Report, and then let the rule be run again as per its normal schedule or manually run the rule. The removed farm servers will no longer appear.
Archive for December, 2020
Servers removed from farm but continue to appear in farm health reports
Posted: December 29, 2020 in SharePoint On Premise0
Rebuild an Microsoft Office Web Apps server farm easily
Posted: December 29, 2020 in SharePoint On Premise- Take the Microsoft Office Web Apps server farm offline if there is a load balancer.
- Collect the current farm information through PowerShell by using the following command on an Microsoft Office Web Apps (WAC) Server(s):Get-OfficeWebAppsFarm > c:\MyWACfarm.txt
- For a multi-server farm, remove each child machine from the farm, and then remove the parent machine by using PowerShell on WAC Servers.Remove-OfficeWebAppsMachineTo find which server is the Parent and which servers are the Child, review the farm output from step 2 and look toward at the bottom for “Machines” listed. The first server is your Parent server and the rest are Child servers. Run the following command on the Child servers first, and as soon as it is completed, run the command on the Parent server. This will delete the farm.
- Reboot the Office Web Apps Servers.
- Re-create the farm through PowerShell on WAC servers by using the parameter values from the command that we ran in step 2.New-OfficeWebAppsFarm -InternalURL “http://WACServer.corp.contoso.com” -AllowHttp -EditingEnabled -OpenFromURLEnabled
- Reunite the Child servers with the Parent server through PowerShell on the WAC server. To do this, run the following command on each Child server:New-OfficeWebAppsMachine -MachineToJoin ParentServer
- Put the farm back online if there is a load balancer.If you want to rebuild the bindings, run the following commands on SharePoint Servers through SharePoint PowerShell:Remove-SPWOPIBinding –All:$trueNew-SPWOPIBinding –ServerName “WACServer.corp.contoso.com” -AllowHttp
To verify that your Microsoft Office Web Apps server farm was configured correctly, go to https://servername/hosting/discovery in a web browser.
If Office Web Apps server is working as expected, you should see a Web Application Open Platform Interface Protocol (WOPI)-discovery XML file in your web browser.
(Get-OfficeWebAppsFarm).Machines
Repair-OfficeWebAppsFarm
Recently I was trying to update Oct 2020 CU for Office Web Apps 2013 and it was failing with below error.
Error: Local .msp package missing. Attempt failed to restore ‘c:\windows\installer\3436b2.msp’ – ‘{5375F009-BDB0-41CD-AB47-C02A6486236F}’ – ‘Update for Microsoft SharePoint Enterprise Server 2013 (KB2889845) 64-Bit Edition
Error: Local .msp package missing. Attempt failed to restore ‘c:\windows\installer\c43526.msp’ – ‘{7AB8A0B1-79CE-4945-BD40-49F327B613A7}’ – ‘Service Pack 1 for Microsoft Office Web Apps Server (KB2880558) 64-Bit Edition
Error: Registered build version does not match detected build version. Registered build: 15.0.4571.1502. Detected build: 15.0.4420.1017. Updated registered build to new value 15.0.4420.1017
Tried by running oputil.vbs from working server but no luck, errors remains same.
After some research, I tried below steps and I was successful.
1. Repaired Office Web Apps 2013.
2. Repaired Office Web Apps 2013 SP1.
3. Installed Oct 2020 CU.
SharePoint Server zero downtime patching steps SharePoint 2016 / 2019
Posted: December 16, 2020 in SharePoint On PremiseZero downtime patching (ZDP) is available in SharePoint Server 2016 and SharePoint Server 2019. Let users keep working on, saving, and searching documents as you patch your SharePoint Server 2016 or SharePoint Server 2019 farm.
Note
The steps in this article and information about Zero downtime patching also apply to SharePoint Server 2019.
Zero downtime patching is a method of patching and upgrade developed in SharePoint in Microsoft 365. It was made to let administrators patch the service at the same time as users kept using their subscriptions. In other words, this tested method is designed to allow patching while people actively work with their files, and search crawls and renders results, on the SharePoint Server farm. That’s what’s meant by ‘zero down time’.
A couple of things to note as we discuss ZDP (we’ll talk about these elements later in the article).
- Your ZDP experience could be enhanced by using MinRole in SharePoint Server 2016 or 2019, but MinRole is not a requirement.Why could MinRole help?
- Your farm must leverage high availability (HA) to reap the benefits of ZDP. A highly available SharePoint Server 2016 farm is a requirement for ZDP.Why is High Availability required?
It’s important to remember that the goal of ZDP is uptime for your users, so, in this article, all the decisions involved in patching and rebooting your farm will be made with that bias in mind.
Important
Even if all the servers in your SharePoint Server 2016 or 2019 farm were configured to use the ‘Custom’ role, you can still manually configure a highly available farm. There are documents on TechNet that will help you construct highly available farms, and the principals of fault tolerance (having redundant hardware) and high availability (having systems and software in place to support failover and continuation of uptime) are the same. Be aware that in more complex Highly Available or Custom farms, you should take special care to patch the Search servers in a way that supports HA, for example, patch one index replica at a time and never patch or upgrade index replicas from the same partition at the same time.
The ZDP Process
This example uses ZDP against a SharePoint Server 2016 farm set up using MinRole. The example environment looks like this:
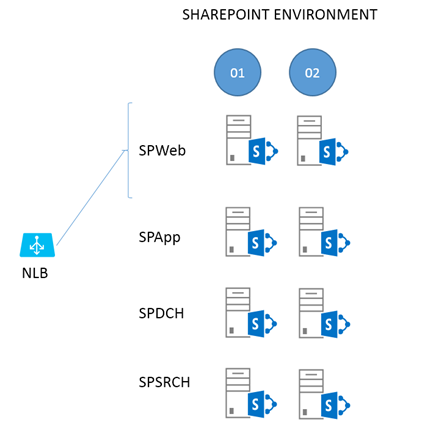
To break this structure down, two web-front ends (WFEs) (SPWeb01 and 02) are connected to a load balancer, both are fielding requests at this point. There are two Application Servers (SPApp01 and 02), two Distributed Cache servers (SPDCH01 and 02) and two Search Servers (SPSRCH01 and 02). Behind this structure, but not directly included in the ZDP process, is a SQL Server cluster (for example, SQL Server Always-On).
Ideologically, you can draw a line through the middle of the farm in this diagram, from top to bottom. On one side of the line are all the servers ending in ’01’ (column 1), and the redundant servers in ’02’ are on the other (column 2). We’ll make use of this dual construction to keep the farm up for users while patching.
For the most part, everything you do on one side of the line (to the 01 servers) you’ll exactly repeat for 02. Of all the steps involved in the relatively simple, two phase ZDP process, those taken with the WFEs (SPWeb01 and 02) are the most complex. We’ll start there.
Note
General information on Software Updates for SharePoint Server 2016 can be found here. Notice that the article links out to documentation on permissions settings for SharePoint Server 2016. Review these articles as needed, and remember that part of patching involves database updates. If you’ve changed SQL Server permissions for SharePoint accounts post-installation, for example, you’ll need to review these articles.
Make sure you’ve rebooted and tested your WFEs before you take either out of the load balancer to avoid situations where the WFE to be patched first is taken out of rotation, and other WFEs don’t handle the resulting load. All servers in the farm should be fresh from a reboot and healthy before you patch. Also, consider stopping Search crawls and Profile Imports during the upgrade or patch window.
Important
Side-by-side functionality, previously enabled with the below script, has been enabled regardless of the ‘enableSideBySide’ value as of KB3178672 (March 2017 update) for SharePoint Server 2016 and above.
For SharePoint Server 2016 farms without KB3178672 or higher applied, side-by-side functionality can be applied with the following PowerShell scripts:
$webapp = Get-SPWebApplication <webappURL>$webapp.WebService.EnableSideBySide = $true$webapp.WebService.update()
Running in side-by-side ensures that all the web front ends in the farm serve the same static content during the upgrade, even if static files on a given WFE are being upgraded or replaced. Side-by-side is built in to PSCONFIG but must be enabled. This feature makes sure users have the same experience of the sites when browsing SharePoint and working on their files, even while file-system files are being changed and updated.
Phase 1 – Patch install
The first phase is getting the patch binaries on the servers and installing them there.
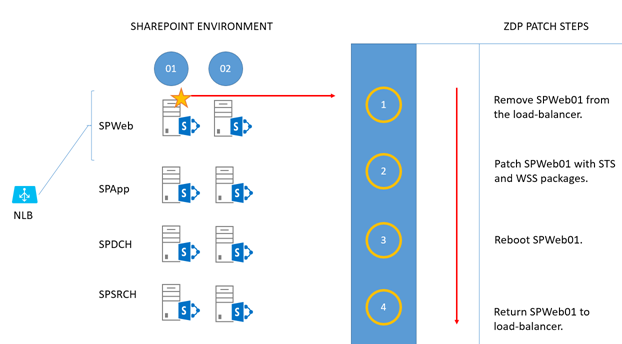 Take the first WFE (SPWeb01) out of the load balancer and patch it with the ‘STS’ and ‘WSS’ packages.
Reboot the server when patching is done.
Return the server to rotation in the load balancer.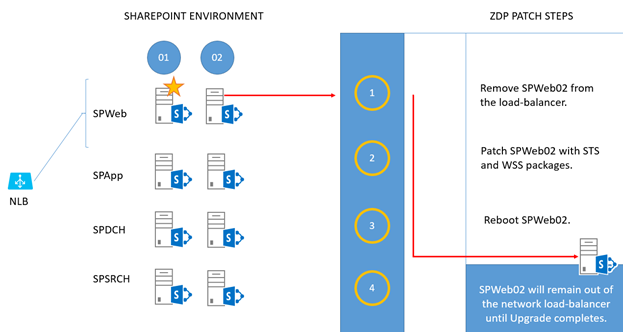 Take the second WFE (SPWeb02) out of the load balancer and patch it with the ‘STS’ and ‘WSS’ packages.
Reboot the server when patching is done.
Leave this server out of the load balancer until the entire upgrade is complete. NoteIf you aren’t running the upgrade in a maintenance window and the farm has a lot of load, you can return this WFE to the network load balancer until you’re ready to run PSCONFIG.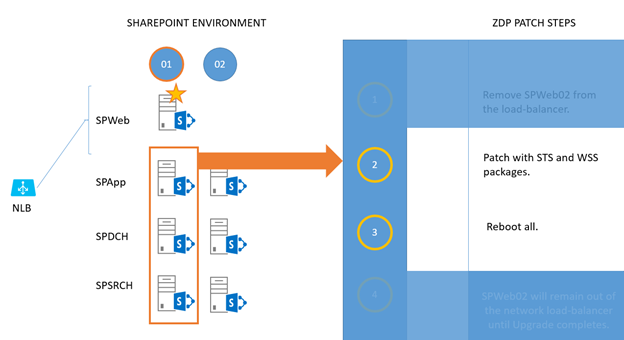 For each of SPApp, SPDCH, and SPSRCH in column 1, patch with ‘STS’ and ‘WSS’ packages.
Reboot them when they’re done. (The work sent by SPWeb01 will fall on servers in column 2).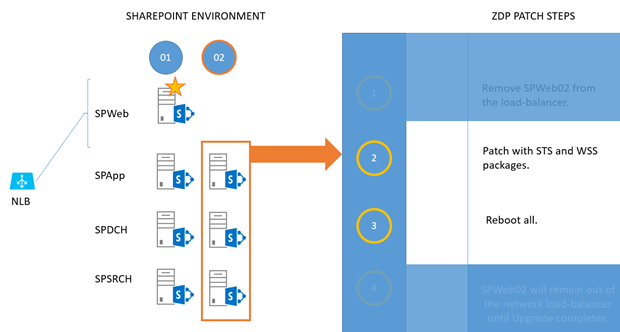 Now you repeat the ‘patch and reboot’ for column 2. For each of SPApp02, SPDCH02, and SPSRCH02 in column 2, patch with ‘STS’ and ‘WSS’ packages.
Reboot them when they’re done. (As you can see, work sent by SPWeb01 will now fall on servers in column 1.)
Phase 2 – PSCONFIG upgrade
Every node in the SharePoint Server 2016 farm has the patches installed, and all have been rebooted. It’s time to do the build-to-build upgrade.
Note
During the ZDP process, you can run Upgrade-SPContentdatabase to reduce the overall time it will take to finish running PSCONFIG. Consider this if you have a large number of databases, or select large databases.
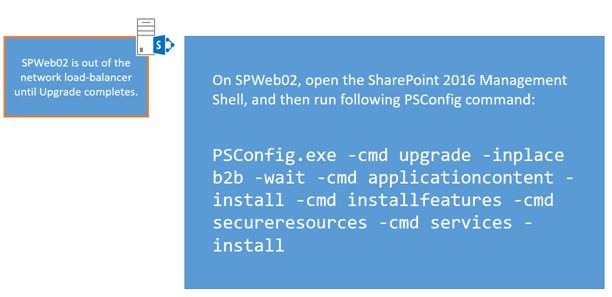 Return to the WFE that is out of load-balanced rotation (SPWeb02), open the SharePoint 2016 Management Shell, and run this PSCONFIG command:PowerShellCopy
PSCONFIG.exe -cmd upgrade -inplace b2b -wait -cmd applicationcontent -install -cmd installfeatures -cmd secureresources -cmd services -installAfter the command completes, return this WFE (SPWeb02) to the load balancer. This server is fully patched and upgraded. TipThe last step in the PSCONFIG process ensures that updates to the User Interface (UI) are copied from the /layouts folder to a version-specific folder. This is part of the side-by-side UI update that lets users browsing your farm have one experience of the UI until the upgrade is completed, and you’re ready to switch over to the new interface.
To be sure the side-by-side copy was successful, check the associated logfile. By default, this is located under:
C:\program files\common files\Microsoft shared\web server extensions\16\logs. (Your root drive letter may vary!)
If, for some reason, PSCONFIG didn’t successfully copy UI files, please run this command to manually copy them Copy-SidebySideFiles!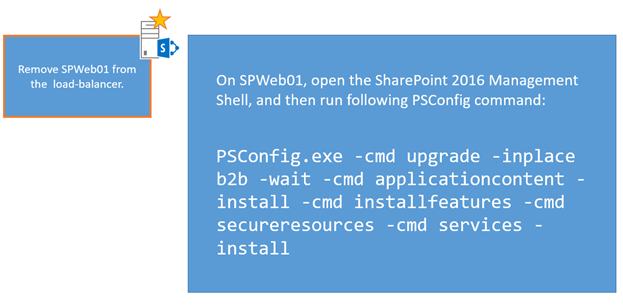 Remove SPWeb01 from the load-balancer. > Open theSharePoint 2016 Management Shell and run the same PSCONFIG command:PowerShellCopy
PSCONFIG.exe -cmd upgrade -inplace b2b -wait -cmd applicationcontent -install -cmd installfeatures -cmd secureresources -cmd services -installReturn this WEF (SPWeb01) to the load balancer. It’s also fully patched and upgraded now.Both WFEs are patched and upgraded. Move on to the remainder of the farm, but be sure that the required Microsoft PowerShell commands are run one server at a time and not in parallel. That means, for all of column 1, you’ll run the commands one server at a time. Then you’ll run them, one server at a time, for servers in column 2 with no overlapping. The end-goal is preserving uptime. Running the PSCONFIG commands serially is the safest and most predictable means of completing the ZDP process, so that’s what we’ll do. For all remaining servers in column 1 (SPApp01, SPDCH01, SPSRCH01), run the same PSCONFIG command in the SharePoint 2016 Management Shell. Do this on each server, one at a time, until all servers in column 1 are upgraded. ImportantRemember to gracefully remove the Distributed Cache before running PSCONFIG and add the Distributed Cache to the server again after completion.PowerShellCopy
PSCONFIG.exe -cmd upgrade -inplace b2b -wait -cmd applicationcontent -install -cmd installfeatures -cmd secureresources -cmd services -install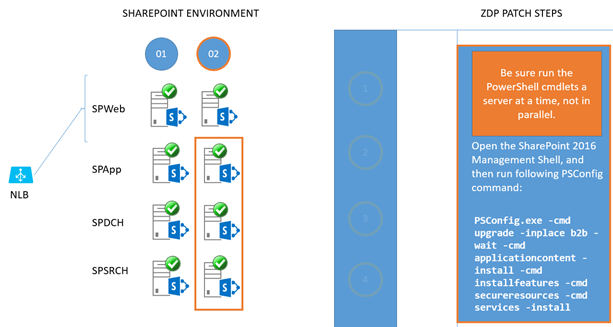 For all remaining servers in column 2 (SPApp02, SPDCH02, SPSRCH02), run the same PSCONFIG command in the SharePoint 2016 Management Shell. Do this on each server, one at a time, until all servers in column 2 are upgraded. ImportantRemember to gracefully remove the Distributed Cache before running PSCONFIG and add the Distributed Cache to the server again after completion.PowerShellCopy
PSCONFIG.exe -cmd upgrade -inplace b2b -wait -cmd applicationcontent -install -cmd installfeatures -cmd secureresources -cmd services -installImportantAfter all servers have been through PSCONFIG successfully, remember to run the SharePoint 2016 Management Shell command below to switch to the new user interface files and complete the side-by-side process:$webapp.WebService.SideBySideToken = <current build number in quotes, ex: "16.0.4338.1000">$webapp.WebService.update()
Now you’re done, and the farm has been fully upgraded while in use and without downtime.
Why could MinRole help?
When you talk about ZDP you should also address the concept of MinRole. MinRole is an option in the installation of SharePoint Server 2016. It breaks the configuration of a farm into roles like Front End (WFE), Application Server (App), Distributed Cache (DCache), Search, or Custom (for custom code or third party products). This configuration will give you four servers on average – two WFEs, two App servers, two DCache servers, and two Search servers.
By default, WFEs are tweaked for low-latency, and the App servers for high-throughput. Likewise, bundling search components so that calls don’t have to leave the box on which they originate makes the Search servers work more efficiently. One of the biggest benefits of MinRole is that it builds-in fault tolerance.
Why is High Availability required?
HA is a broad topic in SharePoint. There are entire whitepapers and articles about it online, such as this documentation via TechNet. To simplify the concept, at least for this article, realize that ZDP (and also MinRole) originated in SharePoint in Microsoft 365. In SharePoint in Microsoft 365, virtualized servers have redundancies built in, so that two of the same role of server from the same SharePoint farm won’t live on the same host or rack. This makes SharePoint more fault-tolerant. You can model the same situation by having two of each SharePoint Server role on separate hosts on different racks in your own datacenter, with a shared router or cabling between racks to make for quicker communication. You can also simply have two physical servers for each SharePoint Server role set up in a test environment (choosing separate power bars for each half of your farm, and making sure that routing between the set of servers is fast and, if possible, bypasses wider network traffic for lower latency).
The goals here are high availability and fault tolerance. That means top priorities are separating the roles across racks or servers, making sure you have two of every role, facilitating quick network traffic between these two tiers, and making sure your set up has systems in place to monitor and automatically failover database servers. In terms of manually installing services in SharePoint (as when choosing the ‘Custom’ role) it is important that the services have redundancy inside the farm. For example, Distributed Cache is clustered, your farm has multiple WFEs, you set up Application and Search servers in pairs. That way, in the event that one server has a serious issue, the other can handle user load.
In examples used here, I draw out physical servers to make concepts easier to grapple with. When it comes time to plan for ZDP, you should draw out your own environment, wherever it lives (complete with rack names/numbers, and server names where each SharePoint Server role can be found). This is one of the quickest ways to isolate any violations of the goals of role redundancy and fault tolerance that might have snuck into your setup, no matter the size your setup may be.
Ref: SharePoint Server 2016 zero downtime patching steps – SharePoint Server | Microsoft Docs
What is MinRole?
New farm topology based on predefined server roles.
You select the role of each server as you add it to the farm
SharePoint automatically configures services based on the role
Note:
This overview assumes that you have installed the November 2016 Public Update for SharePoint
Benefits of MinRole:
Simplifies the SharePoint deployment experience.
Optimized to improve performance and reliability.
Simplifies capacity planning and fam scalability.
MinRole Server Roles
Dedicated Roles
Optimized for performance and scalability
Used in large scale farms
Also used in medium scale farms with shared roles
Shared roles:
Optimized for fewer servers by consolidating dedicated roles together
Used in small and medium scale farms
Special Roles:
Used for special case scenarios (testing, development, and services that don’t integrate with MinRole)
Dedicated Roles:
Front End: Handles user requests, including page rendering, service applications etc.
Application: Handles background tasks and requests, such as timer jobs, search crawls, etc.
Distributed Cache: Provide high speed cache for certain types of data in the farm
Search: handles search functionality such as indexing, content querying for search results etc.
Shared Roles:
Front-end with Distributed cache: Combines the front-end and distributed cache roles on the same server
Application with Search: Combines the application with search roles on the same server.
Special Roles:
Single-Server Farm: All services and components run on a single server.
For development, testing and limited production tasks.
Custom: Hosts services that haven’t integrated with MinRole yet.
Farm administrator manages services on this role instead of MinRole
As per new farm topology MinRole will scan the farm once in a day
If It detects any non-compliance, it’ll detect automatically repairs make it compliance and will reports to administrator.
We can disable this scan as well.
Four server farm will not support high availability.
We can make support using role conversion feature.
SharePoint Patch Installation Most Common Issues and Fixes
Posted: December 2, 2020 in SharePoint On PremiseIssue 1:
The installation of cumulative updates on SharePoint servers is a task which all the organizations must work on in order to keep their farms updated. There are several challenges encountered during this process. The first step is to install the patch files on each server. Let’s see the most common issues faced during this step and how can we fix them. “An error encountered while running detection” Cause This error occurs when the required MSI and MSP files are missing from C:\Windows\Installer folder. The patch .exe is running checks for all the required installer files in the C:\Windows\Installer folder. If any file is missing, then it gives the error “An error encountered while running detection.” Solution The first thing to do is check for a healthy server on which you are able to execute the patch .exe file without this error. This means that the healthy server has all the required MSI/MSP installer files required by the update. The next step is to copy all those missing files from the healthy server to your impacted server. This cannot be a direct copy/paste.Follow the below steps:
- Run ROIScan.vbs on the impacted server. This will list all the missing files from the installer folder. You can download this file from here.
- Make sure that Oputil.vbs is there in C:\Windows\System32 folder. If not, then download it from here.
- Now open Windows powershell and go to C:\Windows\System32. Then, run the below command:
cscript.exe Oputil.vbs /srestorelocation=\\<workingservername>\c$\windows\installer” - This will restore all the files from the working server. Then you can execute the patch .exe file and it should fix this issue.
Note: Never delete any file from the installer folder “Installation of this package failed” Cause There are mainly two causes of this issue:
- There is not enough space present in C: drive of the server,
- The .exe and .cab files downloaded from Microsoft site have issues.
Solution Make sure there is enough space available in the drives of your server. Download the patch installation files again from the Microsoft website.
Issue 2:
Introduction Sometimes, SharePoint Administrators face this issue while performing a SharePoint patch. Even after successfully installing the SharePoint patch file, the config wizard shows that the patch is still missing on the server. On checking the Manage Servers On-Farm page in Central Admin, it still shows the status of the server as ‘Upgrade Required’. Also, on the product/patch installation page, the user can see many updates as missing/required.
Solution The solution to this issue is simple. You just need to run below command on that server:
Get-SPProduct -Local
After this, refresh the Manage Servers on the farm page and you will see the updated status.
